to extract in from .bz2 , use below
bzip2 -cd files.tar.bz2 | tar xvf -
and to compress into .bz2 , use below
bzip2 -cd files.tar.bz2 | tar tvf -
Selasa, 03 Februari 2015

Setting up PostgreSQL on Solaris
Setting
up PostgreSQL on Solaris
PostgreSQL is bundled with Solaris 10 and is available from
the primary OpenSolaris IPS repository.
To check if PostgreSQL is installed
in your Solaris instance you can use the following command:
$
svcs "*postgres*"
STATE
STIME FMRI
disabled
Feb_16
svc:/application/database/postgresql:version_81
disabled
16:11:25 svc:/application/database/postgresql:version_82
Install
Required Packages
If you don't see any PosgreSQL
instance in your Solaris box then proceed and install the following packages
(the list may actually change over time):
- SUNWpostgr
- SUNWpostgr-contrib
- SUNWpostgr-devel
- SUNWpostgr-docs
- SUNWpostgr-jdbc
- SUNWpostgr-libs
- SUNWpostgr-pl
- SUNWpostgr-server
- SUNWpostgr-server-data
- SUNWpostgr-tcl
Check
if PostgreSQL SMF Services are Configured
After installation, SMF services
should be listed by (the output may depend on the actual PostgreSQL version you
installed):
$
svcs "*postgres*"
STATE
STIME FMRI
disabled
Feb_16
svc:/application/database/postgresql:version_81
disabled
16:11:25 svc:/application/database/postgresql:version_82
On Solaris, PostgreSQL is managed by
the SMF framework. If you're curious you can check the service manifest at /var/svc/manifest/application/database/postgresql.xml and the service methods at /lib/svc/method/postgresql. Many important parameters are stored in the service
configuration file (postgresql.xml): if you want to change some parameters
(such as PostgreSQL data directory) you must use svccfg to
edit the service configuration.
PostgreSQL
and RBAC
PostgreSQL on Solaris uses RBAC to
give users permissions over the database instance. When you install Solaris'
PostgreSQL packages an RBAC role is setup for you:
[/etc/passwd]
postgres:x:90:90:PostgreSQL Reserved UID:/:/usr/bin/pfksh
This user is setup as an RBAC role
in /etc/user_attr file:
[/etc/user_attr]
postgres::::type=role;profiles=Postgres
Administration,All
Permission for the Postgres
Administration profiles are setup in the /etc/security/exec_attr file:
[/etc/security/exec_attr]
Postgres
Administration:solaris:cmd:::/usr/postgres/8.2/bin/initdb:uid=postgres
Postgres
Administration:solaris:cmd:::/usr/postgres/8.2/bin/ipcclean:uid=postgres
Postgres
Administration:solaris:cmd:::/usr/postgres/8.2/bin/pg_controldata:uid=postgres
Postgres
Administration:solaris:cmd:::/usr/postgres/8.2/bin/pg_ctl:uid=postgres
Postgres
Administration:solaris:cmd:::/usr/postgres/8.2/bin/pg_resetxlog:uid=postgres
Postgres
Administration:solaris:cmd:::/usr/postgres/8.2/bin/postgres:uid=postgres
Postgres
Administration:solaris:cmd:::/usr/postgres/8.2/bin/postmaster:uid=postgres
Starting
PostgreSQL
You can start PostgreSQL using the
following SMF command from an account with the appropriate privileges:
$ su - postgres
$
svcadm enable svc:/application/database/postgresql:version_82
Initial
Configuration
By default, PostgreSQL is configured
to trust all of the local users. That's not a good practice because all your
local users may connect to PostgreSQL as a superuser. The first to do is
setting up a password for the postgres user:
$
psql -U postgres
postgres=# alter user
postgres with password 'your-password';
Exit psql with
the \q command and change the /var/postgres/8.2/data/pg_hba.conf file to set an appropriate authentication method and change
the following line:
[/var/postgres/8.2/data/pg_hba.conf]
local
all all trust
with, for example:
[/var/postgres/8.2/data/pg_hba.conf]
local
all all md5
Next time you connect, PostgreSQL
will be asking you for the user password. Now, let's refresh the PostgreSQL
service so that PostgreSQL will receive a SIGHUP signal
an re-read the pg_hba.conf file:
$
svcadm refresh svc:/application/database/postgresql:version_82
Done!
You're now running a PostgreSQL
instance on your Solaris box ready to be given to your database administrator,
ready for production use.
terminal server has exceeded the maximum number of allowed connections
once time uou'll get the message "The terminal server has
exceeded the maximum number of allowed connections" when you try to log
on to a shared server through Remote Desktop.
 to fix this problem , you have to run this command:
Windows 7/2008 Server:
you can also experiment with this command
qwinsta /server:servername.domain
logoff /server:servername.domain
Windows 7/2008 Server:
mstsc.exe /admin /v:server_name or mstsc.exe /admin /v:server_ip_addrWindows 2003 server:
mstsc.exe /console /v:yourservername or mstsc.exe /admin /v:server_ip_addr
you can also experiment with this command
qwinsta /server:servername.domain
logoff /server:servername.domain
Rabu, 05 Maret 2014
How to delete the contents of the Temporary Internet Files folder
The Temporary Internet Files (or cache) folder is used by Windows
Internet Explorer and by MSN Explorer to store webpage content on the
computer hard disk for quick viewing. This cache lets Internet Explorer
or MSN Explorer download only the content that has changed since you
last viewed a webpage, instead of downloading all the content every time
that the page is displayed.
To delete the files in the Temporary Internet Files folder for you, jut follow this steps :
Windows 7 and Windows Vista
Earlier versions of Windows
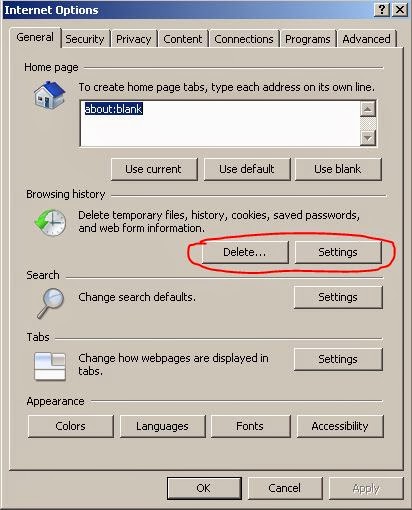


To delete the files in the Temporary Internet Files folder for you, jut follow this steps :
Windows 7 and Windows Vista
- Click Start , click Control Panel, click Network and Internet, and then click Internet Options.
- Click the General tab, and then click Delete under Browsing history.
- Click Delete all, click Yes to confirm that you want to delete this information, and then click OK

- Exit Internet Explorer.
- Exit any instances of Windows Explorer.
- Click Start, click Control Panel, and then double-click Internet Options.
- On the General tab, click Delete Files under Temporary Internet Files.
- In the Delete Files dialog box, click to select the Delete all offline content check box.
- Click OK two times.
Selasa, 10 Desember 2013
Change Logo on Nagios
you can change your nagios logo site application on your nagios server installed
just go to the "/usr/local/nagios/share/images"
the default main logo of nagios is file with name "sblogo.png"
if you don't want to complicated just put image with same size and replace "sblogo.png" with your new custom picture
just go to the "/usr/local/nagios/share/images"
the default main logo of nagios is file with name "sblogo.png"
if you don't want to complicated just put image with same size and replace "sblogo.png" with your new custom picture
Kamis, 07 November 2013
Solaris System Administrator Notes
ADD STATIC ROUTE IN UNIX SOLARIS
#route add net 28.133.0.0/18 172.24.105.1
-add the route accross reboot-
#vi /etc/rc2.d/S69static_routes
ODS
# metastat|grep -i maint
# metastat -p (to check the controller where metadevices are originally mounted)
# format (to check the current controller)
# metastat |grep -i replace (to check the metadevices to be replaced)
(and then do the replacement)
# metareplace d0 c2t0d0s0 c1t0d0s0 (note that c1 is the new controller)
# metadb -a -c3 /dev/dsk/c1t0d0s3 (create meta database for the new controller c1)
# metastat | grep resync
# while true
>do
>metastat | grep resync
>sleep 1
>done
RSH
Enable rsh in Solaris 10
# svcadm enable svc:/network/login:rlogin
# svcadm enable svc:/network/login:rlogin
Enable rsh in solaris 8
# vi /etc/inetd.conf
- uncomment
shell stream tcp nowait root /usr/sbin/in.rshd in.rshd
- restart inetd daemon
# pkill -HUP inetd
AUTOFS
- check the files /etc/auto_master and /etc/auto.dumps file
- once changes made, u need to do 'automount -v' to pickup the config files
- on the client share the filesystem
# share -F nfs -o ro /dumps
- edit /etc/dfs/dfstab
# share -F nfs -o ro /dumps
- restart nfs
# svcadm restart nfs/server
# dfshares or exportfs (to verify nfs shares)
NFS
- mount the dir
# mount -F nfs hkgfiler2:/remedy /opt/ar/directa
- edit /etc/vfstab to mount it upon boot up
hkgfiler2:/remedy - /opt/ar/directa nfs yes rw,soft
NTP
# svcadm disable ntp
# cp /etc/inet/ntp.client /etc/inet/ntp.conf (and type-in ntp servers)
e.g.
server hkgba00001
server hkgba00002
#ntpdate -d
#svcadm enable svc:/network/ntp
DU
Check for Top directory users
# du -sk /export/home/* | sort –nr
TAR
Un-tar tar.gz file IN SOLARIS
gunzip -c file_name.tar.gz |tar xvf –
or
# gzip -d snap_sol10.tar.gz
# tar xf snap_sol10.tar
Create tar file
tar cvf dir.tar
Create create .gz
#gzip dir.tar
HBA
Check HBA info:
# fcinfo hba-port
NIC
Check network interface
# cat /etc/path_to_inst
# grep bge path_to_inst
"/pci@1f,700000/network@2" 0 "bge"
"/pci@1f,700000/network@2,1" 1 "bge"
"/pci@1d,700000/network@2" 2 "bge"
"/pci@1d,700000/network@2,1" 3 "bge"
Change network interface to auto neg “on”
# vi /platform/sun4u/kernel/drv/bge.conf
Check for network collision
# netstat –i
EEPROM
Disable system check during reboot
# eeprom diag-switch? False
PKGADD
To add a package
# pkgadd –d .
REXEC
Disable rexec in Solaris 8
# vi /etc/inetd.conf
- comment out
exec stream tcp nowait root /usr/sbin/tcpd in.rexecd
exec stream tcp6 nowait root /usr/sbin/tcpd in.rexecd
- then restart inetd daemon
# pkill -HUP inetd
SWAP
- create local swap area - in kilobytes(k), blocks(b) or megabytes (m)
# mkfile 1024m /new_swap (create 1GB swap)
- activate the swap area
# swap –a /new_swap
- verify
# swap –l
LOCALE
- set system-wide locale
# vi /etc/TIMEZONE
- set user locale
# vi .profile
LVM (Logical Volume Management)
- install lvm software
- partition disks
# fdisk partition (e.g. /dev/sdb1)
- create physical volumes
# pvcreate /dev/sdb1
# pvcreate /dev/sdc1
# pvcreate /dev/sdd1
# pvscan
- create volume group and make it available
# vgcreate /dev/sdb1 /dev/sdc1 /dev/sdd1
# vgchange –a y
# vgdisplay
# lvcreate –-size 3493G –-name
# lvdisplay
# mount /dev/
- rename a logical volume group
# vgdisplay –v
# vgchange –a n /dev/
# vgrename /dev/ /dev/
# vgchange –a y /dev/
# vgdisplay –v
# vgdisplay –v ext
- rename a logical volume
# lvdisplay /dev/ext/
# lvrename /dev/ext/ /dev/ext/
# lvdisplay /dev/ext/
- make a filesystem on the disk
# mkfs.xfs –f /dev/fhome/fanhome
# mount /dev/fhome/fanhome /home
# mount –t xfs /dev/ext/nfsdata /mnt
- add a new drive to a volume group
# vgdisplay –v (check active disks)
# fdisk to create partition
# umount /bak/backups (filesystem to extend)
# pvcreate /dev/sdf1 (prepare new partition)
# vgextend bak /dev/sdf1
# lvresize –-size 5.999T /dev/shome/home (increase size)
# mount /dev/bak/backups /bak/backups
# xfs_growfs /bak/backups
ERROR/s Encountered
Error: SOLARIS box running slow
Resolution:
# mpstat 5 5 (check usr,sys usage)
# prstat -s cpu -n 5 (list by cpu usage and top 5 processes)
# prstat -s cpu -a -n 5 (list usage per user)
Error: Veritas config daemon vxconfigd not running
Resolution:
# modinfo|grep vx
If DMP is enabled the /etc/system will have the force load entries and the driver "vxdmp"
# grep vxdmp /etc/system
forceload: drv/vxdmp
# vxdctl mode
mode: enabled
Next, run vxinstall or do a vxconfigd -k -m enable
Error: Timed out while waiting for NIS to come up
Resolution:
- logon to console
- do a “send brk” to get to “ok prompt”
- boot to single user mode
Ok> boot –s
- temporarily disable RPC service or remove /etc/defaultdomain to prevent NIS from starting at system boot
# mv /etc/rc2.d/S71rpc /etc/rc2.d/NOS71rpc or
# rm /etc/defaultdomain
# or exit to continue booting to default runlevel
Error: “Umount: I/O error” or “umount: cannot unmount /mount_point”
Resolution:
# fuser –c /file_system
# kill -9 process_id (from the above fuser command)
# lsof +D /file_system
# umount –f /file_system
# mount | grep /file_sytem
Error: No directory – logged on with (/) directory
Resolution:
- restart autofs
# /etc/init.d/autofs stop; /etc/init.d/autofs start
- re-login
Error: Media Error (hard disk with bad sectors)
Resolution:
# format
- select the disk to read test
> anal (select analyze)
> read
#route add net 28.133.0.0/18 172.24.105.1
-add the route accross reboot-
#vi /etc/rc2.d/S69static_routes
ODS
# metastat|grep -i maint
# metastat -p (to check the controller where metadevices are originally mounted)
# format (to check the current controller)
# metastat |grep -i replace (to check the metadevices to be replaced)
(and then do the replacement)
# metareplace d0 c2t0d0s0 c1t0d0s0 (note that c1 is the new controller)
# metadb -a -c3 /dev/dsk/c1t0d0s3 (create meta database for the new controller c1)
# metastat | grep resync
# while true
>do
>metastat | grep resync
>sleep 1
>done
RSH
Enable rsh in Solaris 10
# svcadm enable svc:/network/login:rlogin
# svcadm enable svc:/network/login:rlogin
Enable rsh in solaris 8
# vi /etc/inetd.conf
- uncomment
shell stream tcp nowait root /usr/sbin/in.rshd in.rshd
- restart inetd daemon
# pkill -HUP inetd
AUTOFS
- check the files /etc/auto_master and /etc/auto.dumps file
- once changes made, u need to do 'automount -v' to pickup the config files
- on the client share the filesystem
# share -F nfs -o ro /dumps
- edit /etc/dfs/dfstab
# share -F nfs -o ro /dumps
- restart nfs
# svcadm restart nfs/server
# dfshares or exportfs (to verify nfs shares)
NFS
- mount the dir
# mount -F nfs hkgfiler2:/remedy /opt/ar/directa
- edit /etc/vfstab to mount it upon boot up
hkgfiler2:/remedy - /opt/ar/directa nfs yes rw,soft
NTP
# svcadm disable ntp
# cp /etc/inet/ntp.client /etc/inet/ntp.conf (and type-in ntp servers)
e.g.
server hkgba00001
server hkgba00002
#ntpdate -d
#svcadm enable svc:/network/ntp
DU
Check for Top directory users
# du -sk /export/home/* | sort –nr
TAR
Un-tar tar.gz file IN SOLARIS
gunzip -c file_name.tar.gz |tar xvf –
or
# gzip -d snap_sol10.tar.gz
# tar xf snap_sol10.tar
Create tar file
tar cvf dir.tar
Create create .gz
#gzip dir.tar
HBA
Check HBA info:
# fcinfo hba-port
NIC
Check network interface
# cat /etc/path_to_inst
# grep bge path_to_inst
"/pci@1f,700000/network@2" 0 "bge"
"/pci@1f,700000/network@2,1" 1 "bge"
"/pci@1d,700000/network@2" 2 "bge"
"/pci@1d,700000/network@2,1" 3 "bge"
Change network interface to auto neg “on”
# vi /platform/sun4u/kernel/drv/bge.conf
Check for network collision
# netstat –i
EEPROM
Disable system check during reboot
# eeprom diag-switch? False
PKGADD
To add a package
# pkgadd –d .
REXEC
Disable rexec in Solaris 8
# vi /etc/inetd.conf
- comment out
exec stream tcp nowait root /usr/sbin/tcpd in.rexecd
exec stream tcp6 nowait root /usr/sbin/tcpd in.rexecd
- then restart inetd daemon
# pkill -HUP inetd
SWAP
- create local swap area - in kilobytes(k), blocks(b) or megabytes (m)
# mkfile 1024m /new_swap (create 1GB swap)
- activate the swap area
# swap –a /new_swap
- verify
# swap –l
LOCALE
- set system-wide locale
# vi /etc/TIMEZONE
- set user locale
# vi .profile
LVM (Logical Volume Management)
- install lvm software
- partition disks
# fdisk partition (e.g. /dev/sdb1)
- create physical volumes
# pvcreate /dev/sdb1
# pvcreate /dev/sdc1
# pvcreate /dev/sdd1
# pvscan
- create volume group and make it available
# vgcreate
# vgchange –a y
# vgdisplay
# lvcreate –-size 3493G –-name
# lvdisplay
# mount /dev/
- rename a logical volume group
# vgdisplay –v
# vgchange –a n /dev/
# vgrename /dev/
# vgchange –a y /dev/
# vgdisplay –v
# vgdisplay –v ext
- rename a logical volume
# lvdisplay /dev/ext/
# lvrename /dev/ext/
# lvdisplay /dev/ext/
- make a filesystem on the disk
# mkfs.xfs –f /dev/fhome/fanhome
# mount /dev/fhome/fanhome /home
# mount –t xfs /dev/ext/nfsdata /mnt
- add a new drive to a volume group
# vgdisplay –v (check active disks)
# fdisk to create partition
# umount /bak/backups (filesystem to extend)
# pvcreate /dev/sdf1 (prepare new partition)
# vgextend bak /dev/sdf1
# lvresize –-size 5.999T /dev/shome/home (increase size)
# mount /dev/bak/backups /bak/backups
# xfs_growfs /bak/backups
ERROR/s Encountered
Error: SOLARIS box running slow
Resolution:
# mpstat 5 5 (check usr,sys usage)
# prstat -s cpu -n 5 (list by cpu usage and top 5 processes)
# prstat -s cpu -a -n 5 (list usage per user)
Error: Veritas config daemon vxconfigd not running
Resolution:
# modinfo|grep vx
If DMP is enabled the /etc/system will have the force load entries and the driver "vxdmp"
# grep vxdmp /etc/system
forceload: drv/vxdmp
# vxdctl mode
mode: enabled
Next, run vxinstall or do a vxconfigd -k -m enable
Error: Timed out while waiting for NIS to come up
Resolution:
- logon to console
- do a “send brk” to get to “ok prompt”
- boot to single user mode
Ok> boot –s
- temporarily disable RPC service or remove /etc/defaultdomain to prevent NIS from starting at system boot
# mv /etc/rc2.d/S71rpc /etc/rc2.d/NOS71rpc or
# rm /etc/defaultdomain
#
Error: “Umount: I/O error” or “umount: cannot unmount /mount_point”
Resolution:
# fuser –c /file_system
# kill -9 process_id (from the above fuser command)
# lsof +D /file_system
# umount –f /file_system
# mount | grep /file_sytem
Error: No directory – logged on with (/) directory
Resolution:
- restart autofs
# /etc/init.d/autofs stop; /etc/init.d/autofs start
- re-login
Error: Media Error (hard disk with bad sectors)
Resolution:
# format
- select the disk to read test
> anal (select analyze)
> read
Go to ok prompt from ILOM of Sun T5120
Follow below procedure to get to "ok" prompt from ILOM.
1. ssh to ILOM hostname
2. From the ILOM prompt , type the below.
--> set /HOST send_break_action=break
--> start /SP/console to get to the ok prompt.
Manual system reset from the ILOM prompt.
--> set /HOST/bootmode script="setenv auto-boot? false"
--> reset /SYS
1. ssh to ILOM hostname
2. From the ILOM prompt , type the below.
--> set /HOST send_break_action=break
--> start /SP/console to get to the ok prompt.
Manual system reset from the ILOM prompt.
--> set /HOST/bootmode script="setenv auto-boot? false"
--> reset /SYS
Langganan:
Postingan (Atom)